Table of Contents
ToggleThe Gryffindor Common Room is one of Hogwarts Legacy’s most iconic locations, a sanctuary for the bravest witches and wizards at Hogwarts. If you’ve been sorted into Gryffindor, this common room becomes your home base, and it’s packed with surprises most players never fully explore. Whether you’re hunting for hidden collectibles, optimizing your gameplay mechanics, or just soaking in the atmosphere of this legendary house common room, there’s more to discover than meets the eye. This guide walks you through everything you need to know about accessing the space, locating its secrets, and maximizing the benefits it offers to your game progression.
Key Takeaways
- The Gryffindor Common Room is an exclusive sanctuary accessible only to Gryffindor students, featuring crimson and gold décor, a fireplace, and lore-rich details that capture the house’s legendary spirit.
- Access the Gryffindor Common Room through the Fat Lady’s portrait on the seventh floor of Hogwarts Castle, and use it as a fast-travel point for quick returns throughout the game.
- Use the common room’s rest mechanic to fully restore health for free and advance in-game time without consuming potions, making it invaluable for efficient progression and quest planning.
- Discover exclusive collectibles including treasure chests near the fireplace that respawn after major story chapters, Field Guide pages for 100% completion, and Gryffindor-themed equipment scaled to your level.
- Customize your Gryffindor Common Room furniture and layout through the Room of Requirement system to match your playstyle while using the personal trunk for inventory management and gear storage.
- Enhance immersion by treating the common room as your character’s sanctuary, using photo mode for storytelling, and engaging with environmental lore and portraits that deepen your connection to Hogwarts Legacy.
What Is the Gryffindor Common Room?
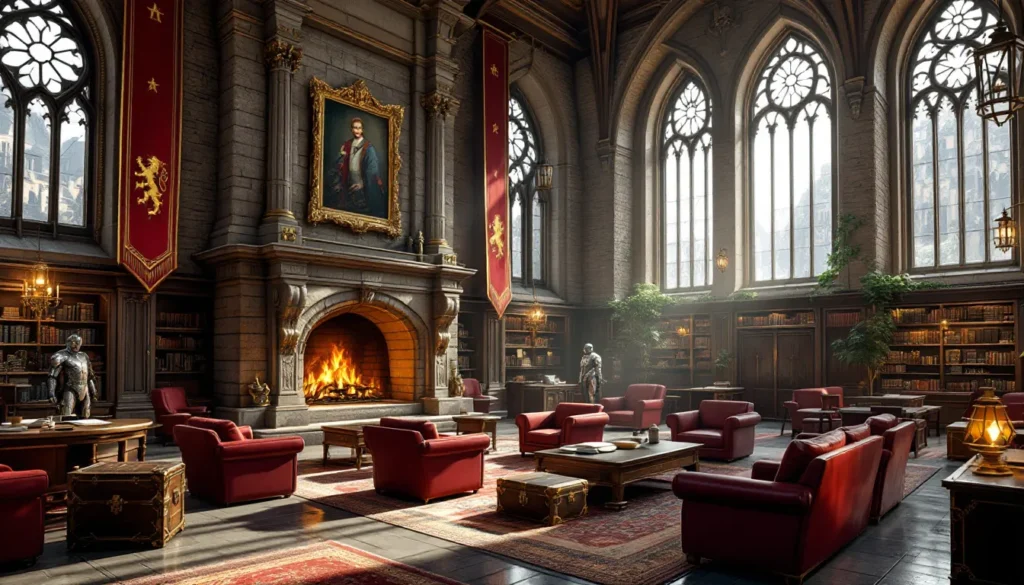
The Gryffindor Common Room serves as the exclusive headquarters for all Gryffindor house students in Hogwarts Legacy. It’s a cozy, firelit space filled with crimson and gold décor, comfy armchairs, and the unmistakable lion banners that represent the bravest house in the castle. Unlike other areas of Hogwarts, the common room is completely accessible only to Gryffindor students, sorting into a different house locks you out entirely.
This isn’t just a pretty backdrop. The common room functions as a functional hub where you can rest to recover health, store items in your private trunk, and access a range of interactive furniture and magical elements. The space captures the essence of Gryffindor’s legacy through its design and lore-rich details. Every corner reflects the house’s adventurous spirit, from the portrait of Godric Gryffindor himself to the various crests and historical artifacts scattered throughout.
For completionists, the common room also hides multiple collectibles and Field Guide pages you won’t find anywhere else in the castle. It’s one of the few spaces where house pride directly translates into gameplay benefits.
How to Access the Gryffindor Common Room
Requirements and House Placement
To access the Gryffindor Common Room, you must be sorted into Gryffindor House during the game’s opening sequence. Your house assignment is determined by your choices during the Sorting Hat dialogue at the beginning of Hogwarts Legacy. This decision is permanent, you cannot change your house after the initial sorting, so choose carefully if house pride matters to your playthrough.
If you’re sorted into Hufflepuff, Ravenclaw, or Slytherin, you’ll have access to your own house’s common room instead, which features unique layouts, decorations, and exclusive collectibles. Each common room is tailored to its house’s identity and values. The good news: every house’s common room offers equivalent gameplay benefits, so you’re not missing out on any mechanical advantages by not being Gryffindor, only on the aesthetic and collectibles unique to that space.
Finding the Entrance and Navigation
The Gryffindor Common Room is located in Gryffindor Tower, which you’ll access through the Fat Lady’s portrait on the seventh floor of the castle. The entrance is marked on your map once you’re far enough into the game. To find it, head to the seventh floor corridor and look for the large portrait with the smiling woman in a pink ball gown, that’s the Fat Lady. Approach her and interact with the portrait, and it’ll swing open to reveal the hidden entrance.
Once inside, the common room is a single large chamber. Navigation is straightforward, there’s minimal risk of getting lost. The space features a large fireplace at one end, seating areas scattered throughout, and various interactive objects positioned around the room. The Gryffindor Tower also connects to the dormitory areas where male and female students sleep, though those areas are generally inaccessible except for story-specific moments.
The entrance is easy to miss if you’re not exploring the seventh floor thoroughly, but once you’ve found it once, the location becomes a regular fast-travel point on your map, making return visits quick and convenient.
Exploring the Common Room Layout and Features
Key Areas and Furnishings
The Gryffindor Common Room is divided into several distinct zones, each with its own character and purpose. The central area features a massive stone fireplace that dominates the room, this is both a visual anchor and a narrative touchstone. Around the fireplace, you’ll find plush seating including high-backed armchairs and sofas in burgundy leather, perfectly suited for studying or resting after a long day of classes.
To the left of the fireplace, a large portrait of Godric Gryffindor hangs on the wall. This isn’t just decoration, it’s historically significant to the house’s lore and represents the founder whose legacy defines Gryffindor values. Near the portrait, you’ll spot shelves and cabinets containing books and decorative items. On the right side, large windows overlook the castle grounds, providing natural light and views of the Hogwarts landscape.
The room also includes study tables positioned near windows for optimal lighting, a small side chamber that connects to the dormitory areas, and various decorative suits of armor standing guard. Every piece of furniture maintains the house’s signature crimson and gold color scheme, creating an immersive atmosphere that makes you feel like you’re genuinely part of Gryffindor House.
Interactive Elements and Customization Options
Hogwarts Legacy gives you the ability to customize how your common room looks through the Room of Requirement’s decoration system. Once you unlock the Room of Requirement (accessible after completing the “Tame a Graphorn” quest), you can purchase and place furniture, decorations, plants, and lighting fixtures in your common room to make it feel personal.
Interactive elements within the common room itself include furniture you can sit on, books you can read (though they offer no mechanical benefit), and various objects you can inspect. The fireplace is interactive and creates a cozy ambiance when activated. Some players use the common room as a personal space to roleplay and immerse themselves in the wizarding world, taking screenshots and treating it like a player housing feature.
You can also access your personal trunk in the common room, which ties into the game’s inventory and storage mechanics. This makes the space functionally valuable beyond just atmosphere. The customization system lets you express your character’s personality, whether you want to keep it faithful to traditional Gryffindor aesthetics or add your own unique flair.
Collectibles and Hidden Secrets
Treasure Chests and Loot Locations
The Gryffindor Common Room contains at least one treasure chest that holds valuable items including gear, galleons, and crafting materials. The chest is typically located near the back of the common room, close to the entrance to the dormitory areas. Specifically, you’ll find it in the corner area to the right of the fireplace, near some of the study furniture.
Inside this chest, you’ll score standard loot that scales to your level, typically ranging from potions to gear pieces and currency. The exact contents vary depending on your progression through Hogwarts Legacy. Some players report finding pieces of Gryffindor-themed equipment here, though that’s not guaranteed on every playthrough. The chest respawns periodically, so it’s worth checking back after major story beats or level-ups.
Beyond the main treasure chest, various interactive objects throughout the common room can yield items when examined. Check desks, shelves, and side tables for additional loot. Nothing here is hidden behind puzzles or difficult-to-reach locations, it’s all accessible on your first visit, which makes the common room a reliable early-game resource for basic supplies.
Field Guide Pages and Creature Encounters
The most valuable hidden secrets in the Gryffindor Common Room are the Hogwarts Legacy Field Guide pages. Field Guide pages contribute to your Completion percentage and unlock lore entries about the creatures, characters, and locations throughout Hogwarts Legacy. The Gryffindor Common Room contains exclusive Field Guide pages you won’t find anywhere else in the game, making it essential for 100% completionists.
Some Field Guide pages can be found lying around the common room as physical collectibles. Others are unlocked by observing creatures that appear in the space, though creature encounters in player housing areas are rare. The creatures most likely to appear in the common room are harmless ones like Bowtruckles or small magical fauna. You don’t need to battle anything to unlock these pages: simply observing the creature once adds it to your Field Guide automatically.
To maximize your Field Guide completion, spend time exploring every corner of the common room. Look under tables, behind furniture, and check shelves carefully. Some pages are easy to spot: others blend into the environment. If you’re missing pages, cross-reference against walkthroughs that detail each location, a few pages in the common room have tricky placements that newish players often miss. Pair this exploration with visits to other Hogwarts World: Discover locations for a complete picture of what Hogwarts has to offer.
Using the Gryffindor Common Room for Gameplay Benefits
Rest and Recovery Mechanics
One of the primary gameplay benefits of the common room is the ability to rest and recover your health. Your character has a health pool that depletes during combat and exploration, and resting is one of the fastest ways to fully restore it. Sitting in one of the armchairs or sofas near the fireplace triggers a “Rest” prompt, and you can sleep to restore your health bar completely.
Resting in the common room is free, no cost in galleons or resources required. You can rest as many times as you want without consequences (unlike using potions, which consume inventory space). This makes the common room invaluable during longer gaming sessions. If you’re grinding through quests or preparing for difficult encounters, you can simply pop back to your common room, rest by the fire, and head back out fully healed.
Also, resting passes in-game time, which can be useful if you’re trying to trigger time-specific quests or events. Certain missions and encounters only occur at specific times of day, so the ability to rest and advance time quickly gives you control over the game’s clock. This mechanic ties the common room directly into progression planning.
Storage and Inventory Management
Your personal trunk in the Gryffindor Common Room functions as storage for excess gear and items you want to keep but don’t need in your active inventory. Hogwarts Legacy gives you a limited carrying capacity, so managing what you hold versus what you store is essential for efficient inventory management.
The trunk system lets you offload heavy items (like extra wands, gear pieces, or ingredients) without losing them permanently. You can access your trunk at any time when you’re in the common room, making it a hub for quick inventory adjustments. This is especially useful if you’re a hoarder, the type of player who collects every bit of loot but doesn’t want it cluttering your inventory during exploration.
Interestingly, your trunk storage syncs across all your personal spaces in Hogwarts Legacy (if you have access to multiple ones through house variations). Some players use this to their advantage, storing bulk items they might need later without keeping them on their person. For rogues or spell-casters focused on specific gear, the trunk makes it easy to swap loadouts without losing old pieces. Treat your common room trunk as a permanent safe deposit box for valuable or rarely-used items.
Tips for Getting the Most Out of Your Common Room
Optimization Strategies
Spread multiple visits to the common room throughout your gaming session rather than waiting until you’re near-death to return. The common room is a fast-travel point, so popping in to rest between quests is faster than chugging potions mid-combat. This passive healing strategy extends your effective playtime and reduces dependency on potion management.
Customize your common room’s layout to match your playstyle. If you’re a dedicated grinder, position furniture to create an efficient rest area. If you’re a completionist, arrange storage furniture so you can quickly access your trunk without excessive walking. The Hogwarts Roleplay: Unlock system benefits heavily from having a well-designed common room that reflects your character’s personality.
Check the common room regularly for respawning treasure chests. After completing major story chapters or reaching new level thresholds, return and loot the chest again, it’ll contain updated gear scaled to your current level. This is a reliable source of early-game and mid-game equipment without needing to hunt bosses or grind specific enemies. Don’t overlook it as a source of steady progression loot.
Keep a dedicated storage slot in your trunk for valuable gear pieces you’re not currently using. This prevents loss due to inventory overflow and gives you easy access if you want to swap builds. Hogwarts Missions: Unlock sometimes benefit from specific gear setups, so having backups ready accelerates your ability to handle different quest types.
Roleplay and Immersion Enhancements
Treat the common room as your personal sanctuary for immersion-focused gameplay. Many players take advantage of the photo mode to capture screenshots that tell their character’s story. The fireplace, comfortable seating, and dramatic architecture make the common room one of the most photogenic spaces in Hogwarts Legacy. Use it as a backdrop for character development moments.
Use the common room’s quiet atmosphere for downtime between adventure arcs. After completing a challenging quest, spend time in your common room reading books, sitting by the fire, or admiring the house portrait. This pacing technique prevents burnout and makes the game feel less like a checklist and more like a living world. The common room is designed to feel like home, lean into that.
Consider decorating your common room in ways that reflect your character’s values and personality. If your protagonist is a fierce duelist, surround yourself with weapons and combat-themed decorations. If you’re a nature lover, add plants and outdoor-themed furniture. The customization system exists precisely for this kind of personal expression. Compare your setup against what you’ve seen in Game Rant guides or community posts, players get incredibly creative with common room design.
Finally, pay attention to the lore and environmental storytelling within the common room itself. The portraits, historical artifacts, and decorative elements all tell a story about Gryffindor House’s legacy. Reading the descriptions and reflecting on what they represent deepens your connection to the wizarding world. This level of engagement transforms the common room from functional space into meaningful location within your Hogwarts experience.
Conclusion
The Gryffindor Common Room is far more than just a house-exclusive aesthetic. It’s a functional gameplay space that offers healing, storage, collectibles, and immersion opportunities that pay dividends throughout your Hogwarts Legacy experience. From the moment you discover the Fat Lady’s portrait to your final hours hunting the last Field Guide page, this space remains relevant and valuable.
Mastering the common room, knowing where to find treasures, how to optimize rest mechanics, and how to use customization to enhance immersion, separates players who merely complete quests from those who truly inhabit the wizarding world. Whether you’re a pure completionist, a roleplay enthusiast, or someone who just wants a safe haven to rest between dungeons, the Gryffindor Common Room delivers on all fronts.
The beauty of Hogwarts Legacy’s house system is that every house common room offers equivalent gameplay value with unique atmosphere and collectibles. Your house choice defines your experience not mechanically, but narratively and visually. Embrace your Gryffindor identity, explore every corner, collect those Field Guide pages, and use that fireplace to its fullest. Your journey through Hogwarts is richer when you treat these spaces as real locations rather than convenient pit stops.